- Whether it’s Bella Hadid’s drooping rips on baggy jeans or it’s Lily Aldridge’s perfectly scissored boyfriend jeans, there’s a lot of inspo to get one such in your wardrobe. Plus, wearing ripped jeans make you look cool and fashion-forward. But, ripped jeans are expensive. And, many of us are not ready to spend on it. Luckily, buying them is not the only option. Today, I’ll show you how to make ripped jeans at home.
- What are Ripped Jeans?
- Why Should You Rip Jeans at Home?
- Where Should You Rip the Jeans?
- What Tools do You Need to Rip Jeans at Home?
- How to Make Ripped Jeans at Home: Complete Tutorial
- Ripping Jeans with a Series of Cuts at the Thigh or Knee
- How to Rip Jeans and Leave the White Thread
- Frayed Hems DIY
- How to Rip Jeans at the Knees?
- Iron Your Jeans
- FAQs
Whether it’s Bella Hadid’s drooping rips on baggy jeans or it’s Lily Aldridge’s perfectly scissored boyfriend jeans, there’s a lot of inspo to get one such in your wardrobe. Plus, wearing ripped jeans make you look cool and fashion-forward. But, ripped jeans are expensive. And, many of us are not ready to spend on it. Luckily, buying them is not the only option. Today, I’ll show you how to make ripped jeans at home.
What are Ripped Jeans?
Ripped, torn, or distressed jeans- all are the same. Any pair of jeans that is ripped or torn is called ripped or distressed jeans.
These kinds of jeans look damn stylish and suit almost everyone. However, this style originated in the 1980s. During the grunge era of the 1990s and 2000s, they start to fade from the fashion industry. Again, they made a comeback in 2010 with the name of ‘Distressed Denim’.
The increasing popularity of ripped jeans is preventing people to toss their slightly torn jeans in the trash. Rather, they’re looking for ways to how to enhance its pretty badass look further. For that reason, I’m here to help you amp up your jeans game with this ripping tutorial.
Why Should You Rip Jeans at Home?
Needless to say, many renowned denim brands are struggling continuously to sell their latest distressed jeans. And, some of them really worth your penny. So, why you need to give the effort to rip jeans at home?
Well, ripping the jeans at home certainly has some advantages. When you hit the shops, you’ll come across many jeans not having the rips exactly where you want. Moreover, the ripped styles also may not match your taste. Surely, you’ve your own preferences when it comes to including something in your jeans-drobe. No need to compromise with your preferences.
Just a little bit of effort and carefulness can give you the ripped jeans you’d love to wear. Slash the jeans in whichever style you want with this tutorial. Keep scrolling to learn.
Where Should You Rip the Jeans?
Your jeans can have holes pretty much everywhere. If you want serious slashes down the leg, go for it. Actually, there’s no thumb rule of fashion. At the same time, you wouldn’t want to be a laughing stock to others. With that in mind, I’ve picked some ripped jeans fashion for you to consider.
a) Boyfriend Jeans: Fully all-over ripped style goes best with it.
b) Skinny Jeans: A little distressed at some points. Or, a small hole at the knee.
c) Vintage Jeans: Ripped in square shapes from knees to the shin of the legs.
Whatever ripped jeans style you’re wearing, make sure it’s matching your personality.
What Tools do You Need to Rip Jeans at Home?
Tools you need to accomplish this job are:
a) A pair of small scissors that are very sharp
b) Pumice stone, steel wool, or a sandpaper
c) A small wooden block or a cardboard
d) Pencil or pen or chalk
e) X-Acto knife or box-cutter
f) A needle and a spool of thread
Get these items handy prior to starting working on your jeans. Once done, take out the jeans or shorts you want to rip. If you’re not confident, try it out on a pair of already rejected jeans. Now, follow the steps.
How to Make Ripped Jeans at Home: Complete Tutorial
Step 1: Wash the Jeans
Wash your jeans a couple of times to rough up the fiber a little. Add a handful of bleach to fade the color slightly. After all, rip styles look unarguably fantastic on faded jeans. Isn’t it?
Step 2: Marking
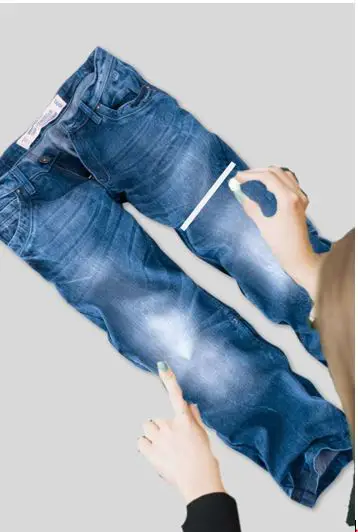
Keep the jeans on a flat surface. Grab the chalk (as it is the best accident-proof marker) to mark the area from where you want to rip.
Step 3: Rub the Marked Areas

Use sandpaper or steel wool or pumice stone to rub the areas vigorously where you’ve marked. Rubbing will give the jeans a worn-out feel. Go on rubbing till you get that look. However, the time you need to get that look depends on the thickness of the fabric.
Step 4: Place a Small Cardboard
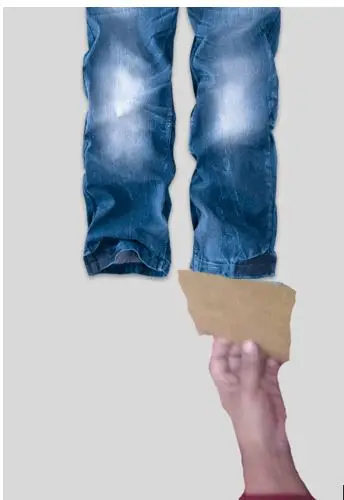
After that, pop a small piece of wooden block or cardboard inside both the legs of your jeans. The cardboard or wooden block protects the backside from being torn.
Step 4: Create Holes
Now, comes the most interesting part. Once your jeans are distressed enough, take the knife or scissors to rip the marked area horizontally. Keep it in mind, always use the edge of the scissors while scarping and not the tips for precision. For creating holes, cut the stray loosened threads too. Make the cuts only that big so that you can wear them comfortably. If you’re ready to expose your skin much, go for big holes. Some of the areas where scrapes and holes look best are at the hems, near your back pockets, and around the knees.
Step 5: Horizontal and Then Vertical Threads
Pull the threads one by one from the sides of the slit with tweezers. First of all, take the horizontal threads and then move on to the vertical threads.
One Pro Tip: To prevent the holes from getting even bigger, sew around the holes’ perimeter. Use a blue or white color thread for sewing.
Step 6: Fray and Fluff the Edges
Fray and fluff the edges for a more distressed look. Use a cheese grater or sandpaper. If you don’t love the frayed look, apply fabric glue around the edges of the holes.
Ripping Jeans with a Series of Cuts at the Thigh or Knee

Follow the above-said steps up to 4.
If you want to know how to make ripped jeans with scissors, here you go.
Make the number of cuts you want with a scissor. Each of the cuts should have a gap of ½ inch and parallel to other cuts. You can go for a length of 2 inches long cut each. You can make the cuts diagonally too for a unique look. Cut the stray loosened threads if you want a neat ripped look. Otherwise, leave it.
One Pro Tip: While cutting make sure the cuts are not touching the seams at the sides. Otherwise, it may affect the fitting.
How to Rip Jeans and Leave the White Thread
This type of ripping is also known as ladder rip.
Let’s dive in straight to the steps.
Mark the areas where you want the patches. Use scissors to cut the areas. Some threads will come out from the ripped area. Now, take the tweezers to prise the threads. Pull out the white threads slightly only so that they create horizontal ladder-like texture. Finally, cut off the blue threads from the ripped edges with scissors.
How to Make Diagonal Rips on the Knees

Lay the jeans on a table (the surface has to be flat). Place a small piece of cardboard inside the legs of your jeans. Use a ruler and chalk to make diagonal lines. Don’t make too long lines. Mind it, the lines shouldn’t touch the seams.
Grab your box cutter or scissor to cut along the lines. That’s it.
Frayed Hems DIY

Image: Source
Want to fix the length of your jeans? The frayed hem is your solution. In addition, they’re the hottest trend.
Use a needle to pull the fibers out from around the hems. Let the fibers hang down. For a softer feel, rub the distressed edges with sandpaper.
How to Rip Jeans at the Knees?
Take your jeans, a pair of scissors, and a pen. First of all, wear jeans to find out the knee area on it. Now, draw a line from just above the knee area. Grab your scissors, fold the fiber of the jeans in half, and start cutting it from the center. The steps are shown in the image below.
Rub the edges of the cuts with a pumice stone or sandpaper to give the cut a distressed look.Iron Your Jeans
Finally, you’ve learned how to make ripped jeans at home. Iron the jeans thoroughly to make sure there’re no more rips apart from the areas where you’ve wanted. This ironing is also important to maintain the look neatly that you’ve created.
FAQs
a) How can you make a hole more frayed?
Just rub over the hole with steel wool or a pumice stone. The hole will automatically become more frayed. Use all your force while rubbing.
b) How can you increase the size of an already frayed hole?
Take an X-acto knife to make the holes bigger. Then, rub it firmly against the unfrayed area with a pumice stone or sandpaper. Go on rubbing to get an evenly frayed hole.
c) What else can you use to rub instead of a sandpaper or a pumice
stone?
The nail file can replace the job of a pumice stone or sandpaper here. However, it may take you a long time to fray the jean with a nail file. Therefore, give more pressure while fraying.

What to Wear with Ripped Jeans: 22 Classy Outfit Ideas

How to Wear Ripped Jeans: 5 Dos and Don’ts
.


